3D Pros-Aide Old Age Temporary Tattoos
at USITT / Furman University
Table of Contents
Problem
Old age characters done in university productions are often problematic, particularly in naturalistic plays. Old age characters done in smaller black box theatres at universities present an even greater problem. Often, between the theatricality of the lighting and the proximity of the audience, the makeup designer has little leeway when it comes to disguising the age of eighteen-year-old actors playing older characters. Three-dimensional make-up done with latex prosthetics or with liquid latex is extremely time consuming. Many directors, costume designers, and actors do not believe the 2 hours plus time spent in the make-up chair is the best use of the actor’s pre-show time.
Solution
During my sabbatical, my goal was to develop a three-dimensional technique in order to age young actors which can be applied in 30 minutes prior to the show, will last for the two-hour duration of a performance, and is reasonably priced, and, therefore affordable for smaller, poorer, departments.
Method
Christien Tinsley, a special effects make-up artist and owner of Tinsley Studio and Tinsley Transfers Inc. developed the Prosthetic Transfer Process. The process facilitates the application of three-dimensional prosthetics by creating the prosthetics as temporary three-dimensional tattoos. You can find Tinsley’s bio on the Stan Winston School of Character Arts Website.
Juli Hapney, a special effects make-up artist whose specialty is gore, formerly based in Los Angeles California but currently residing in Las Vegas, taught me the process by which three dimensional tattoos are created. Originally, I planned to visit her studio in person to learn the process, but because of the problems associated with the Covid-19 Pandemic, my contact with her was limited to online long-distance guidance. I have used the Pros-Aide Prosthetic process to create old-age prosthetics which can be applied either as temporary tattoos or without the waterslide tattoo paper as prosthetics. The Pros-Aide prosthetic making process is time and labor intensive, but the Pros-Aide prosthetics are extremely versatile, fast and easy to apply during the run of a production. The following report is a step by step account of the process.
If you have a hard time following the directions on the following pages, a quick Google search for the Pros-Aide transfer making process will reveal some very good tutorials on You-Tube. Also, you should be aware before you start, this part of the process is labor intensive. Working nonstop, it takes about a day to sculpt the prosthetic and to make the mold. It takes about another day to prepare the Pros-Aide cream, prepare the mold, apply the Pros-Aide to the mold, and then to put it into and take it out of a freezer several times. It then takes between 2 and 4 days to dehydrate the prosthetic. The value of front loading the major portion of the work is manifested in the ease with which the prosthetic can be applied, and the confidence the actor will have while wearing the appliance.
Supply List
- Mold Star 20T (A trial unit costs about $32.00 in the Smooth On Store)
- Easy Mold Silicon Putty costs about $27.00 on Amazon
- Sulfur free clay
- A glass plate on which to sculp
- Mold release-Ease 200 (200 is the aerosol version of 205)
- Silicone paint, (needed only if you desire to actually see the mix happen with the Mold Star 20T)
- Silicone treated Acetate
- Waterslide paper
- Brushes—different brushes for sculpting/mold release/paste wax/ painting etc.
- Vinyl gloves (not latex)
- Craft/popsicle sticks/tongue depressors
- Small solo cups/ solo cups
- Powder
- Johnson paste wax
- Pros-Aide Cream/Pros-Aide
- 99% alcohol and spray bottles
- Paint/ liquid make-up; the alcohol activated palettes work really well with the Pros-Aide pieces.
- Cardboard, plastic tablecloths, paper towels etc. to protect your work space and help clean up
The collection of old age portraits for a reference morgue is recommended.
How to Make Temporary Pros-Aide Tattoo Prosthetics and Old Age
If you have a hard time following the directions on the following pages, a quick Google search for the Pros-Aide transfer making process will reveal some very good tutorials on You-Tube. Also, you should be aware before you start, this part of the process is labor intensive. Working nonstop, it takes about a day to sculpt the prosthetic and to make the mold. It takes about another day to prepare the Pros-Aide cream, prepare the mold, apply the Pros-Aide to the mold, and then to put it into and take it out of a freezer several times. It then takes between 2 and 4 days to dehydrate the prosthetic. The value of front loading the major portion of the work is manifested in the ease with which the prosthetic can be applied, and the confidence the actor will have while wearing the appliance.
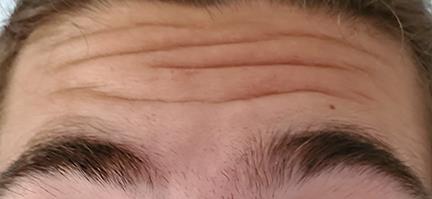
After collecting supplies and deciding on an age for your character, you will need to obtain a series of photographs of the actor for which you building the prosthetics. My son, Mike, graciously allowed me to use his face, since it wasn’t safe to use another student as a model during the pandemic, which is when I started this learning process.
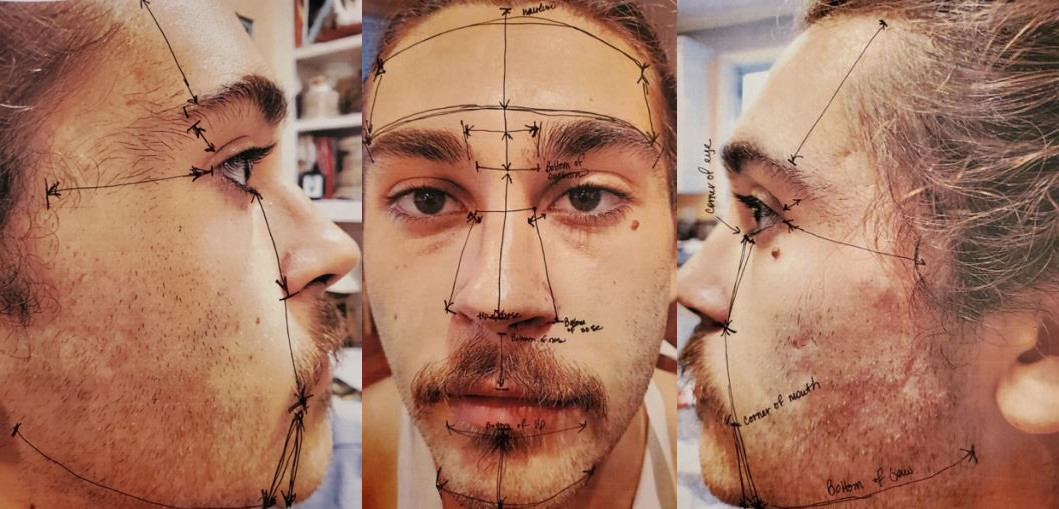
I took three photographs of Mike’s face, a full-face frontal with the actor’s hair pulled out of his face, left profile, and a right profile. When you take your photographs, do not make the mistake I made of getting so close that the face fills the screen, because your photograph will be a wee bit skewed. Do take it close enough to get a good life-sized image, but not so close that your photograph has a fish-eye effect.
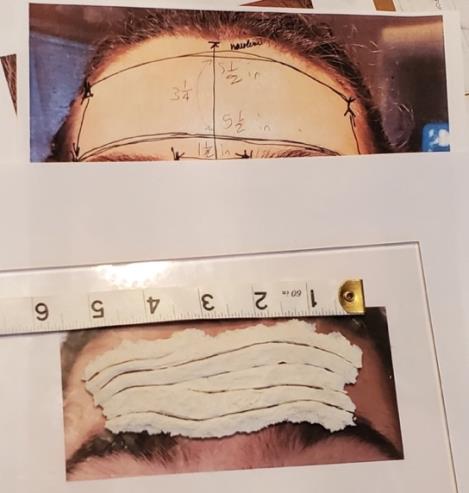
You might also want to take some reference measurements. The measurements are relatively important for reference as you resize your photograph in order to sculpt the prosthetics. You can decide which measurements you will choose in order to make sure that the photographs are life size; here is a list of the measurements I took:
- Length of forehead at either side of the forehead and in the middle. Measure from the tops and ends of the eyebrows.
- Width of forehead, bottom of hairline and top of eyebrows, from end of each eyebrow.
- Length of nose, from top of the bridge of the nose to the tip of the nose.
- Length of both sides of the nose.
- The measurement from the base of the middle of the nose to the top of the top lip.
- The length of the chin, from the bottom of the middle of the lip to the tip of the middle of the chin.
- The length of the chin from either corner of the mouth to the bottom of the chin.
- The width of the middle of the eyebrows over the nose, top of eyebrow and bottom of eyebrow.
- The height of the space between the eyebrow.
- Measure from the outside corner of the eye to the hairline on both eyes.
- The width of the chin across the bottom lip, top and bottom.
- The length of the space between the upper lip from the corner of the outer edge of the nostril to the corner of the mouth on both sides of the face.
- The width of the left jaw line in profile.
- The width of the right jaw line in profile.
- Overall length and width of the face down the middle of the face top to bottom and across the middle of the forehead, bottom of the eyes, and jaw.
The overall measurements, (such as length of face from hairline to chin,) are not as important as the small measurements. But they will tell you how skewed your angle is on your photograph. For example, if you look at the photograph of the full-frontal face below, (which is the photograph I used,) you may notice that, since I took the photograph fairly close, the nose is a little larger proportionately that it actually is on Mike’s face.
I cropped my photographs, sizing them using the measurements I took of Mike’s face. Since my photographs are a little skewed, the measurements aren’t exact for all of the face. Even though the photographs I used were not sized to the exact measurements, I made sure they were close.
I took the photographs too close so they are a little skewed but I used them anyway. Also, it is better if the photographs are not taken at an angle. As you can see from my examples, the right profile is a better shot than the left. I also experimented, removing part of the background in order to better see the profile. But I quickly decided that wasn’t worth the effort.
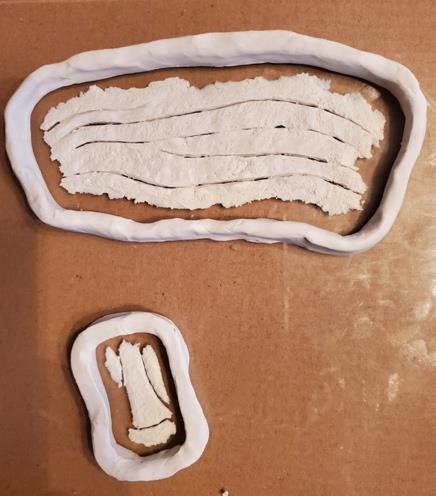
Once they have been printed at or as close to full size as possible, and you are comfortable knowing the images are close to the actual size of the face, you can place the glass plate over the image and sculpt the prosthetic over the image. Before you begin sculpting, you may want to take the time to draw in the boundaries on the face using the measurements you took. For example, if you are sculpting the laugh-lines, measure out the distance between the corner of the eye and the hairline so you will know where to end the edges of the sculpture. It is very important for the success of the application to leave yourself enough space, (at least a quarter of an inch,) between the end of the prosthetic and the edge of the hairline. The prosthetic edges are extremely important, you will need enough room to thin the edge of the prosthetic down to the face before the edge of the prosthetic bumps into the edge of the hairline.
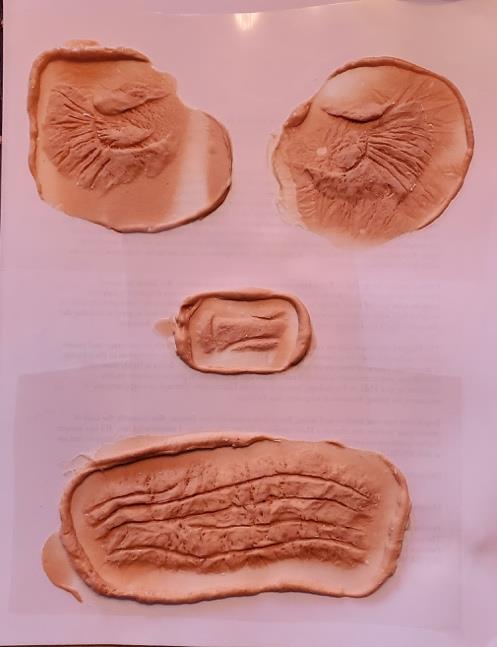
I tend to divide the face in this manner: forehead, eleven, left eye, right eye, left nasolabial fold, right nasolabial fold, left jowl, right jowl, upper lip wrinkles, and lower lip wrinkles. Work each section on its own piece of glass; if you need the security of seeing the makeup as a whole, draw your ideas onto the face before you begin sculpting.
The following is a numbered pictorial guide, designed to take you step by step through the process. Before you begin, gather your supplies, find a good place to work, and be aware that the process will take several days. For your effort, you will be rewarded with a three-dimensional character make-up that should only take about 30 minutes to apply, but will stay put and look terrific for the duration of a two to three-hour performance.
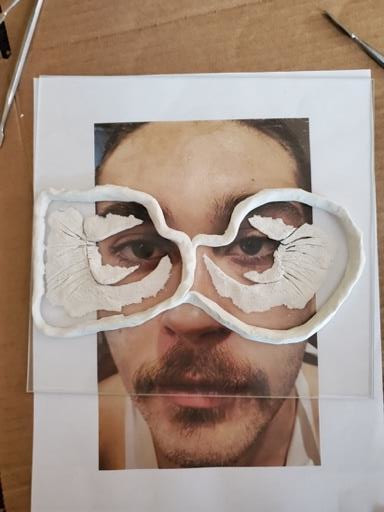
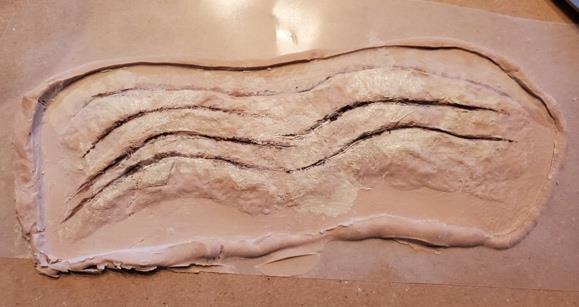
Place a glass plate over your pre-sized photograph and sculpt the prosthetics on the life size photographs of your actor’s face. You may make the prosthetics for the forehead wrinkles, eleven between the eyes, eyebags and pouches on the full front face portrait, or you can photograph each part of the face and size it exactly with photoshop. You may want to sculpt nasolabial folds and jowls on the profile photographs. Remember that if you sculpt your pieces onto the full front photo, the laugh lines will spill beyond the portrait to the side of the face, so keep the actual face measurements in mind. Your prosthetics will look better if you texture the finished sculpture with a toothbrush or eyebrow brush. The following photographs demonstrate the process using the full-frontal photograph and the corners of the eyes to create laugh lines and eye pouches where none exist.
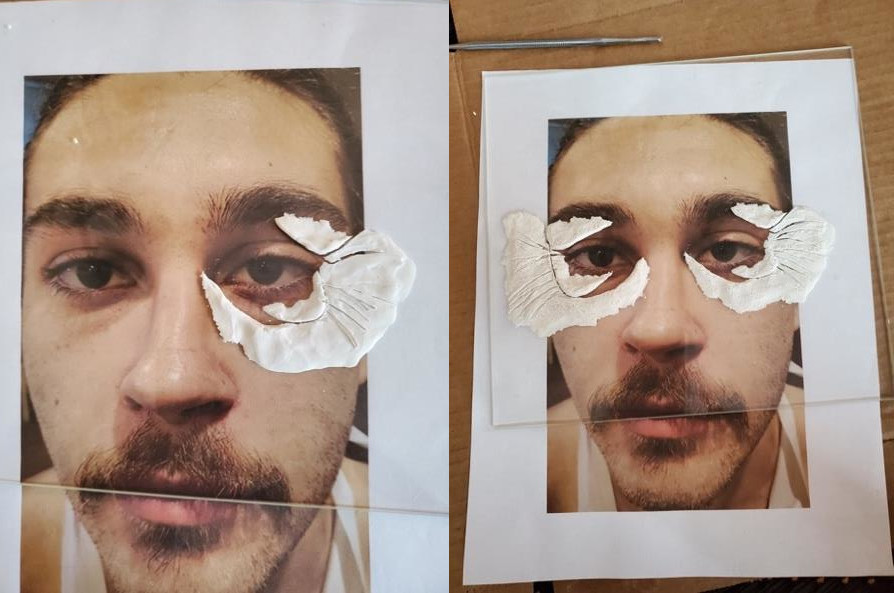
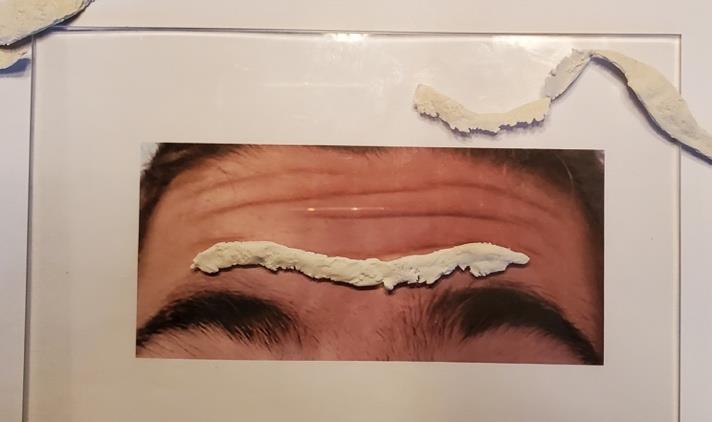
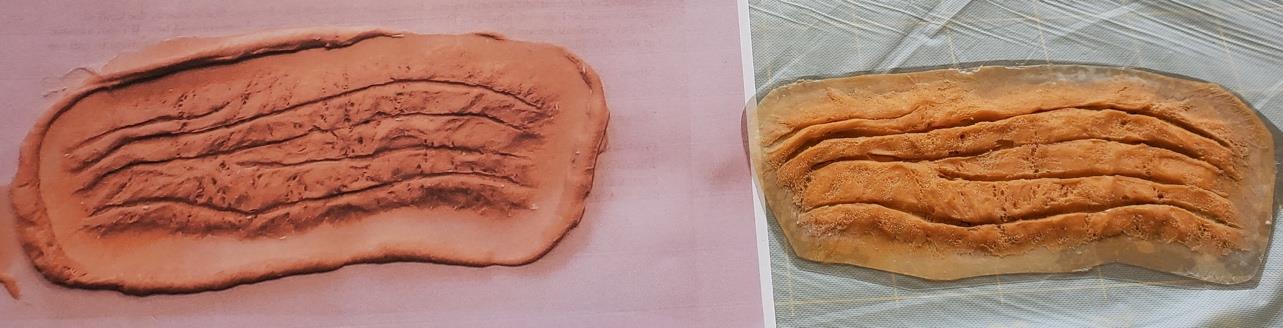
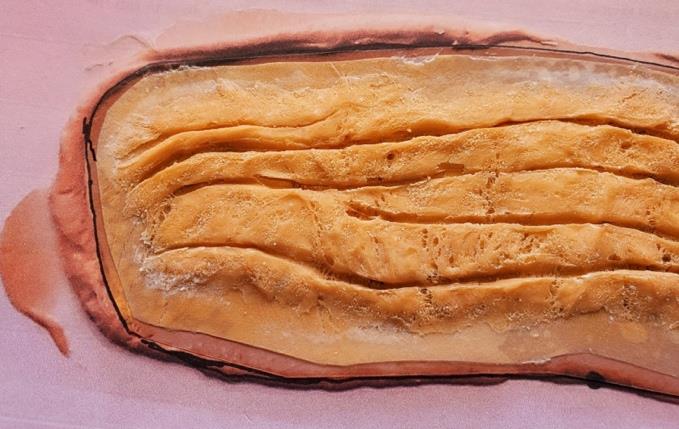
My first attempt at sculpting prosthetics on Mike’s photograph is very stylized. It occurred to me afterward that I should ask for his help for a more natural looking set of wrinkles. Instead of creating my own idea of what I thought the facial wrinkles should look like, I asked him to wrinkle his face so that I could photograph the actual creases made on his forehead, between his eyes, and at the laugh-lines. The photograph below is part of a second series of photographs I took of individual areas of his face contorted for more natural wrinkles. I used those photos as the basis for a second set of prosthetics. Below are examples of the forehead photos full face and cropped. I sized the cropped photo in photoshop using the measurements I took of his forehead. Again, it doesn’t have to be exact, just as close as you can get, making sure to sculpt within the half inch boundaries of the hairline.
The photographs below show the progression of the clay sculpted directly onto a photograph sized to fit within the hairline and eyebrow margins on Mike’s forehead. The first photograph is of the layers built on the glass with clay, using the forehead creases as a guideline. The second photograph is of the finished sculpture, with a measuring tape and the forehead measurements close by for reference.
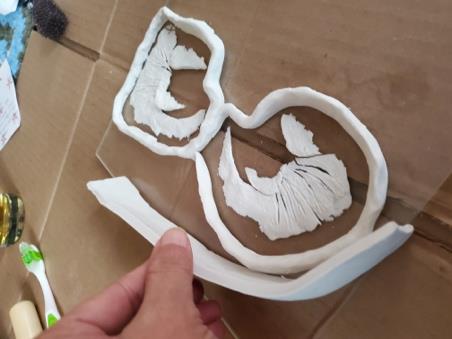
Add flashing, ½’ flashing is fine; you can guess at it, no need to measure.
Add the wall of clay to contain the silicon mold. You can leave yourself a ¼’ to ½’ between the clay wall and the flashing. Be sure this retaining wall is secure enough at the bottom to prevent the silicon from leaking underneath.
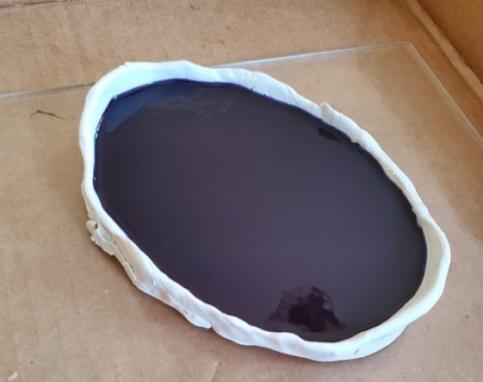
Clean the glass as best as you can. Apply sealant to the sculpture if you have it, (Smooth on Super Seal,) and let it dry for at least five minutes. Then spray the sculpture with Ease Release 205/200 and use a designated brush (for this purpose only) to really coat the sculpture well.
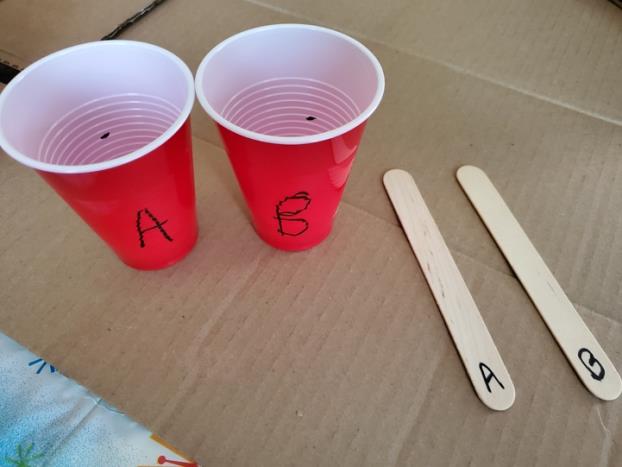
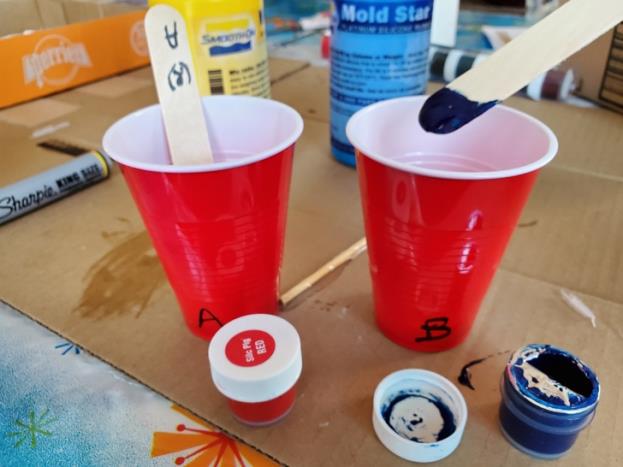
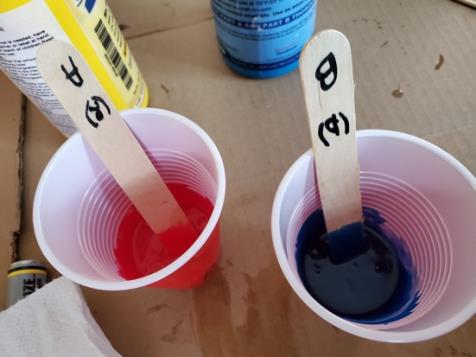
Follow the instructions on your package of Mold Star 20T to mix enough to cover the sculpture by about a half an inch. You might use the solo cups and craft sticks for the process. It is advisable to wear vinyl gloves because the process can be very messy. When you make your first mold, you will find it easier to keep track of everything if you take the time to label your tools before and/or during the process. Be very careful not to contaminate the containers with your two parts; be sure you only use your stir stick for A in A, and your stir stick for B in B. And if you need to, make a mark on the inside of your initial two mixing devices so you use the same amount of each part of the Mold Star 20T A and B bottles.
Since the Mold Star 20T is clear, if you add silicon paint, red to A and blue to B, you will know your mix is stirred well after you have a purple silicone mix in the mixing cup. Be sure to use silicone paint if you choose to add the paint.
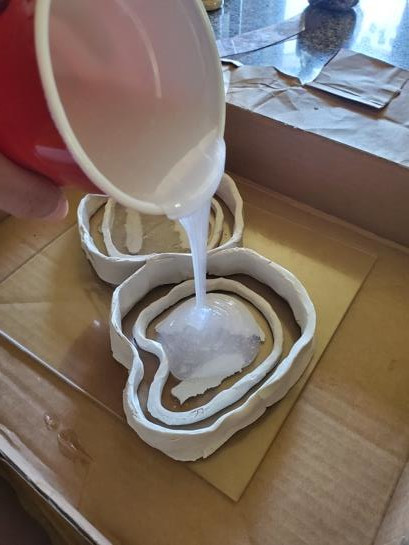
Pour the mixed silicon onto the middle of your sculpture, and let the silicon cover the flashing and move to the edges of the retaining wall. You may want to place the piece you are working on in a cardboard box just in case you need to contain the mess if the silicon leaks under the retaining clay wall. If your retaining wall is about an inch high, and your sculpture is about a quarter of an inch thick, you should have about a quarter of an inch clearing above the poured silicon mold at the containing clay wall.
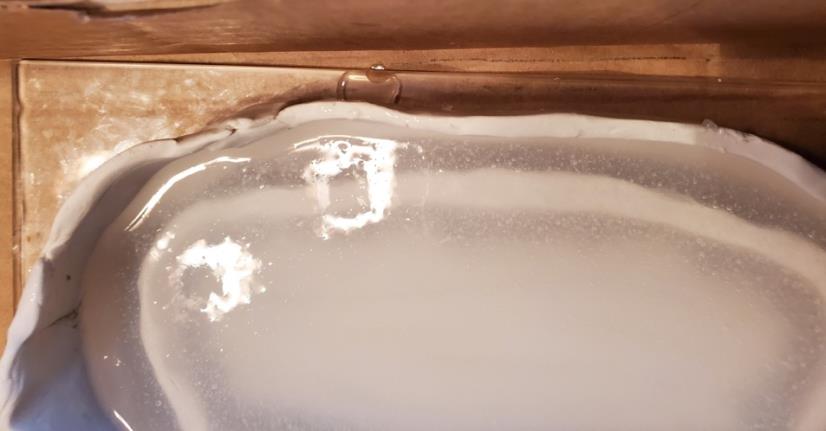
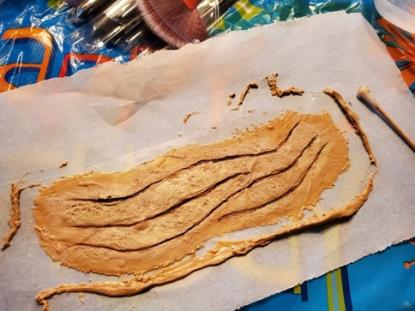
If you didn’t mix paint into your silicon, the mold will be clear. The following set of photographs are of a silicon pour onto a set of jowls, followed by the poured eye bags, pouches and laugh lines.
If you mixed silicon paint into your silicon, your mold might look like this:
The photograph above is of a leak! You can see the silicon leaking underneath the clay retaining wall at the top of this forehead pour. It didn’t become a mess because I placed the piece inside a shallow cardboard box before I poured the mold. And fortunately, the breach in the clay retaining wall was so small that I didn’t waste a lot of the silicon. But it would be better to avoid the leaks by anchoring the clay wall firmly to the glass plate.
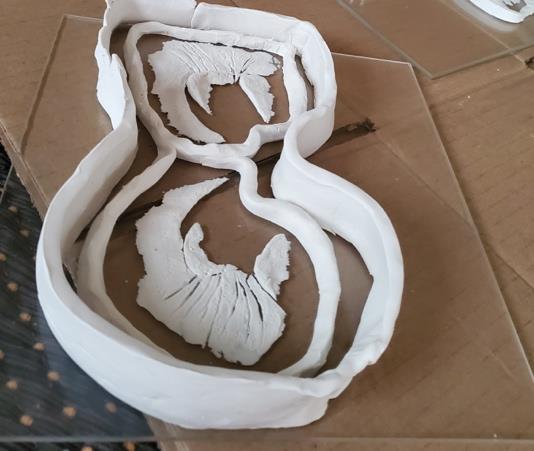
Let the mold cure. With Mold Star 20T, the curing process should take about 30 minutes. In the following photograph silicon molds for an entire face make up are poured and curing.
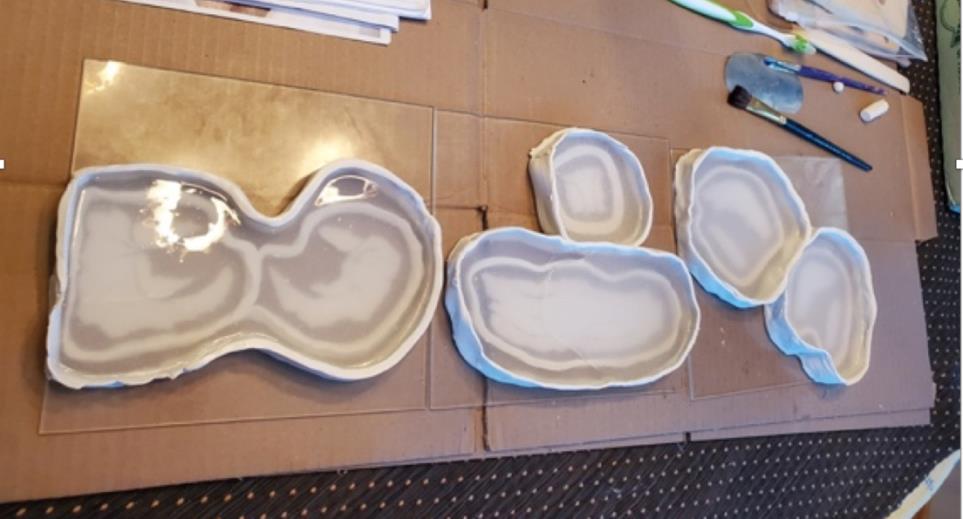
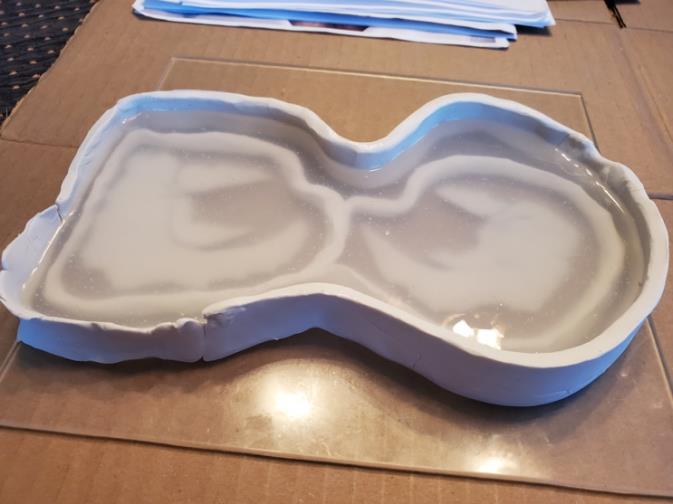
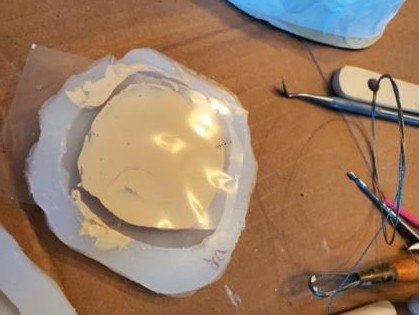
Peel away the clay retaining wall and separate the mold from the sculpture. Because the silicon is pliable and you have applied a release agent, the mold should separate cleanly. Clean the leftover bits of clay out of the mold and get ready to prepare it for making the prosthetics. In the following photographs, jowls and nasolabial fold molds are removed and cleaned in preparation for silicon prosthetics.

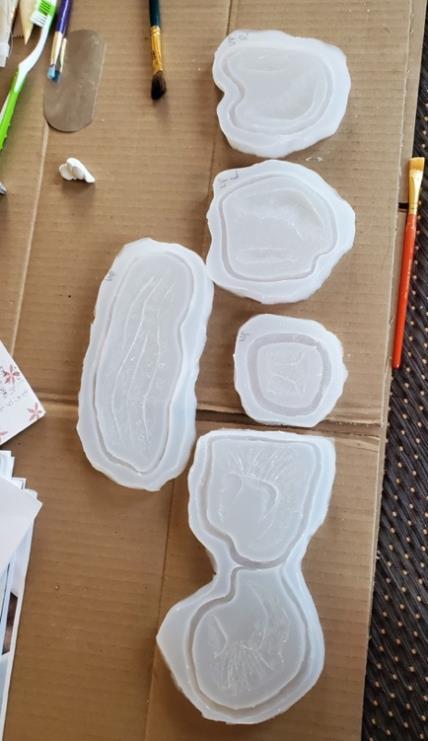
The following photograph is of a set of clean molds for an entire old age face. If you look closely, you will notice that the forehead wrinkles and jowls have been marked in order to keep the left and right jowls from getting mixed up, and so that none of them will be applied upside down.
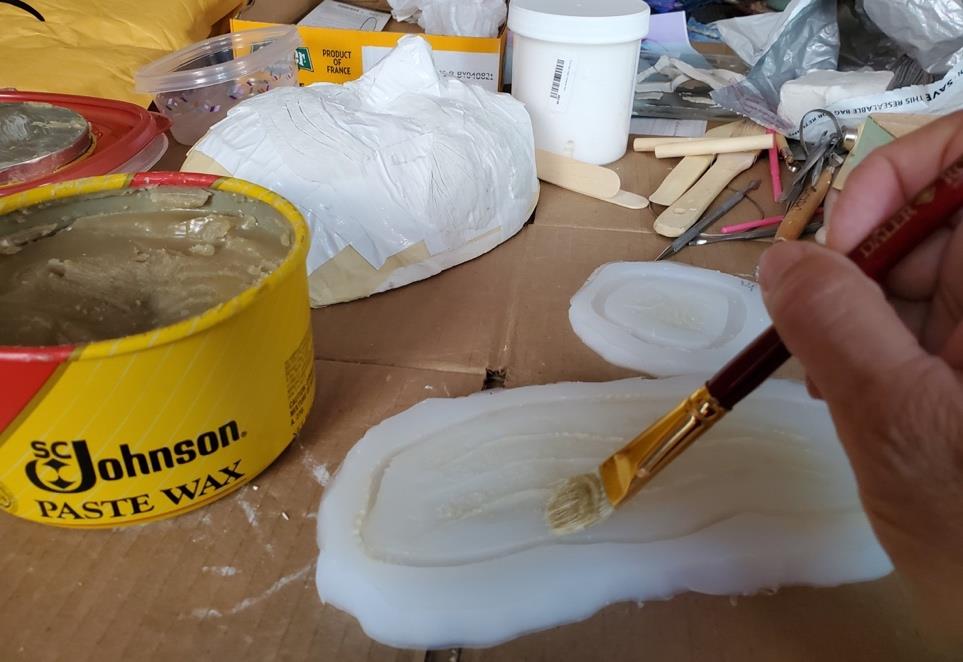
Apply Johnson Paste-wax to the mold as a release for the Pros-Aide prosthetic.
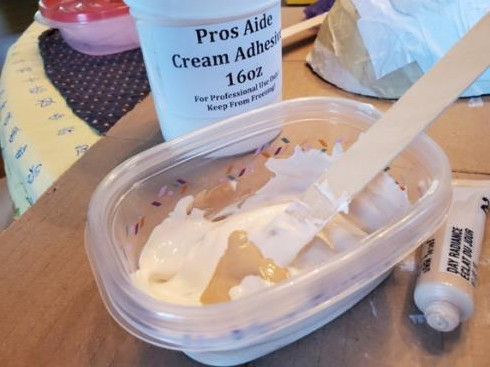
You may want to mix pigment into the Pros-Aide in order to tint the prosthetics and get them as close to the actor’s skin color as possible. For this project, I used some donated tubes of Mary Kay crème make-up. I found the one that was the closest to Mike’s skin color and added just enough to tint the prosthetic; it will be painted with PAX paint and/or an alcohol based make up after it has dehydrated properly, prior to application.
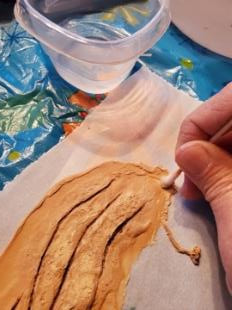
Carefully fill and spread the tinted Pros-Aide into the molds. Cut a piece of silicon treated acetate to fit and place the acetate with the treated side against the Pros-Aide. (You will be able to tell which side of the acetate is the release side by drawing on the acetate with a sharpie. The side on which the sharpie beads up rather than makes a mark is the treated side.)
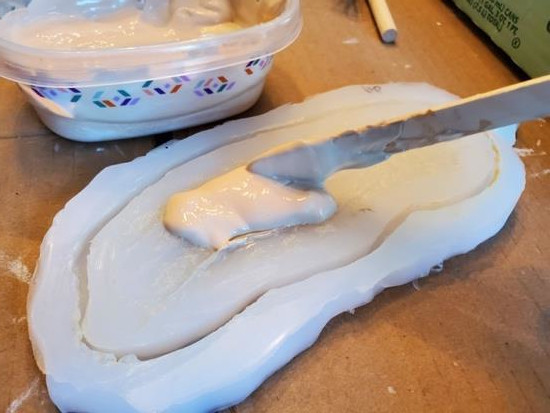
Using a craft stick/tongue depressor or long flat tool, gentle spread the Pros-Aide evenly into the molds under the acetate, pushing the extra Pros-Aide into the flashing built into the mold.
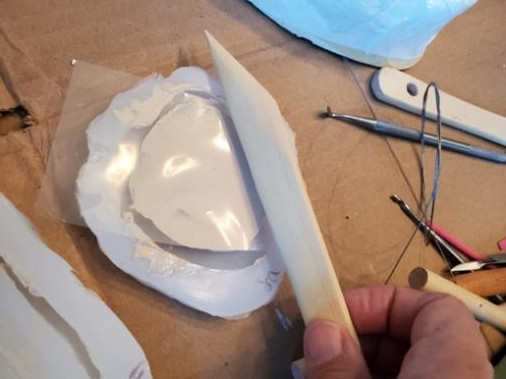
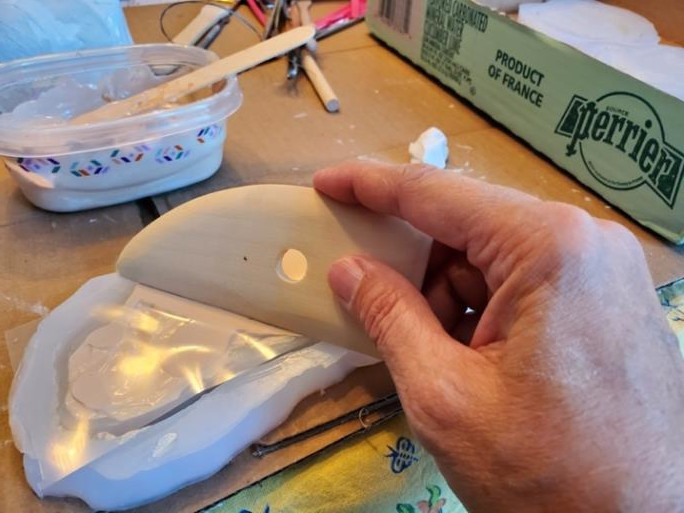
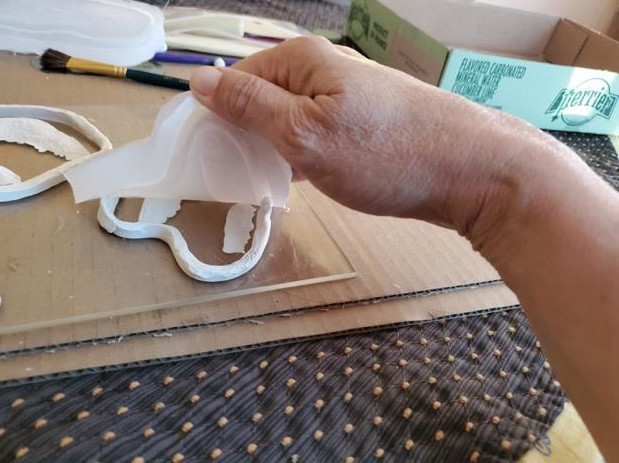
Place the filled mold into the freezer for an hour, take it out of the freezer and let it thaw for an hour; repeat this process several times. When the prosthetic comes out of the freezer for the last time, carefully remove it from the mold while it is still frozen. The silicon mold will easily fold making the removal possible.
Leave the prosthetics alone to dehydrate for several days. If the prosthetics are too sticky to handle easily, they can be lightly powdered.
(You can speed the dehydration process by using a food dehydrator. I cannot give good advice about that process because I just let them air out for several days on my dining room table.)
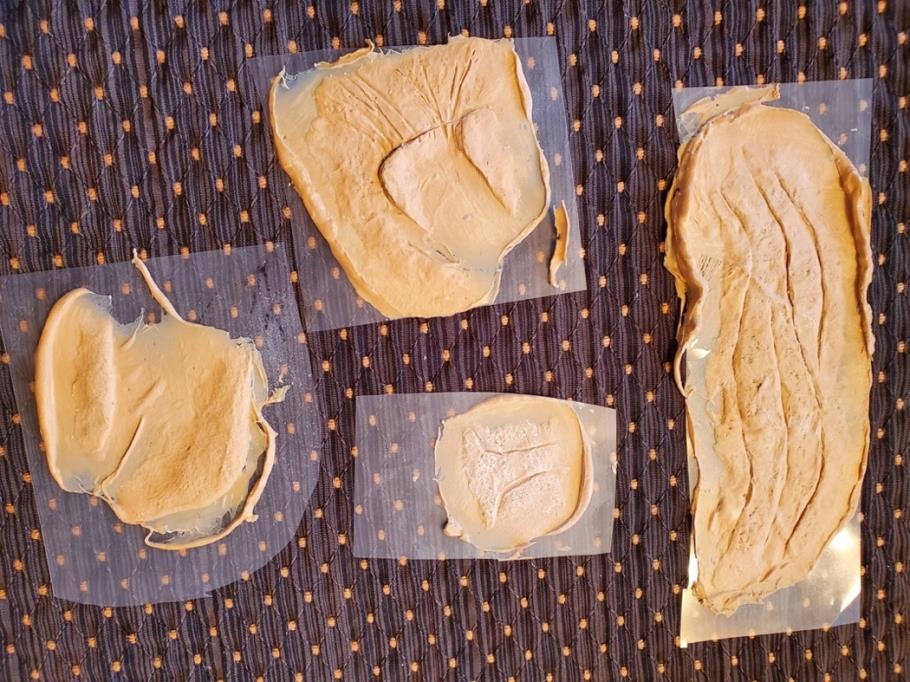
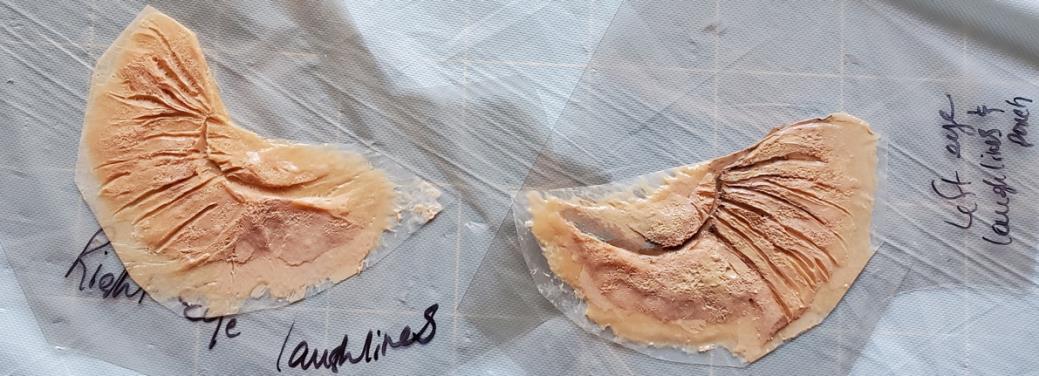
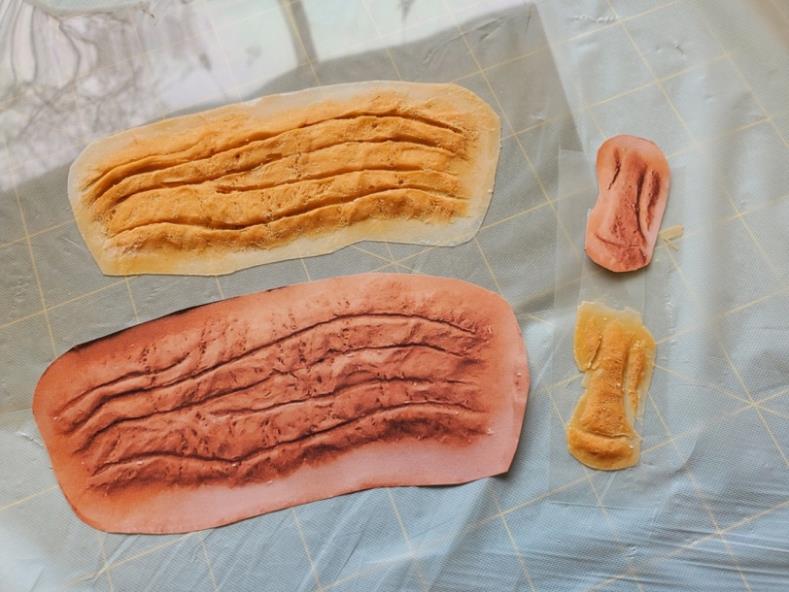
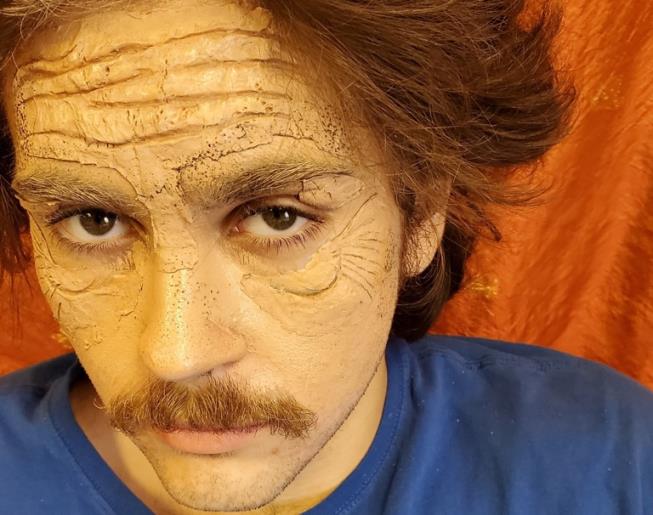
The photographs below are some of the prosthetics made from the molds in the photographs above and are in the process of dehydrating. Notice that the tinted Pros-Aide dried a little darker than it looks when it is still cream. This is because the Pros-Aide dries clear, leaving just the makeup tint for any kind of color and value. Pros-Aide also dries a little shiny, so I use a toothbrush to add some texture to the clay sculpture in order to make the prosthetic look more like skin. Notice that the powder on the forehead eleven lightens the prosthetic a little. The powder can be dusted off or covered up. The ragged edges and flashing will be trimmed prior to application. Also, remember to label the prosthetics if you think you may forget what they are and where they go on the face. And if it isn’t obvious, also be sure to indicate which side is up! (I still get confused over the jowls and so I am sure to label those; if you look closely you can see the R for right side with an arrow indicating up to indicate which side of the face the prosthetic was built for and how it should be positioned.)
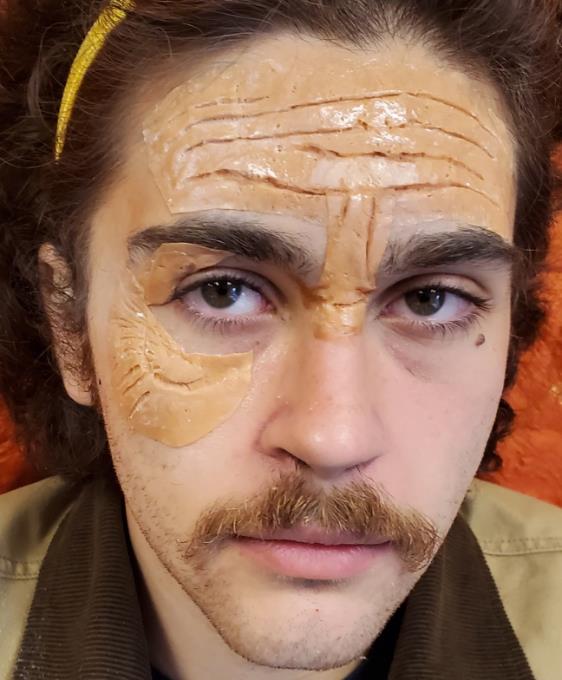
It is possible to pre-paint the prosthetics prior to application in order to further streamline the process. The cheapest way to do this is to mix acrylic paint with liquid Pros-Aide to create the PAX paint for the prosthetic. And since makeup can be applied to the prosthetic after it has been added to the actor’s face, an artist can easily paint on theatrical highlights and shadows prior to that application to stream line the makeup process minutes before showtime. For this set of prosthetics, an alcohol flesh palette was used to add highlights and shadows pre-application.
The forehead wrinkles above left have been painted with highlight and shadow and will be trimmed prior to application.
The laugh lines and eye pouch above right have very little highlight but have shadow applied to the lines that form the troughs in the wrinkles. This may be enough paint if the performance is in a small venue and the prosthetic will get a layer of base make-up as well. If the performance is in a large venue, more highlight and shadow might be added to accentuate the three-dimensional quality of the prosthetic. The laugh lines and eye pouch above left have no additional paint added. Both pieces have been trimmed and prepped for application.
Application
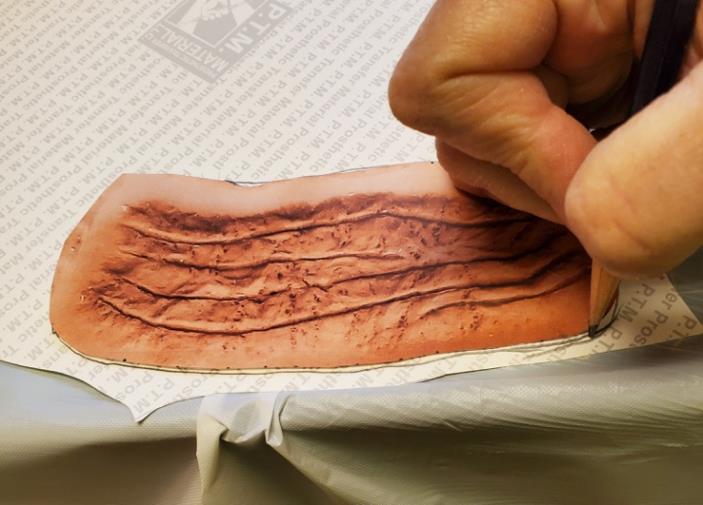
Trim the prosthetic and, if necessary, use 99 percent alcohol to feather or thin the edge of the prosthetic.
The photographs above are of the process of feathering or thinning the edge of a forehead 3D tattoo using 99%.

Above photograph is a prepared and painted forehead wrinkles prosthetic (on the right,) side by side with a prosthetic that has just been pulled out of the mold (on the left.)
Cut a piece of waterslide paper to match the shape of the 3D prosthetic and place the waterslide side against the top of the Pros-Aide prosthetic. Either mark the edges of the prosthetic on the back of the paper, (not the waterslide side,) and mark the up direction with an arrow—or, a.) you can arrange your prosthetics on a letter sized piece of paper and photograph them. Then print the paper. Next b.) trace the shape of the prepared prosthetic on the printed image. Then c.) cut the printed prosthetics out and d.) use double stick tape to attach them to the back of your waterslide paper in the exact place and direction that your prosthetic is attached on the other side. Then you can tell where and how the lines on prosthetic will end up on the face as you are applying the tattoos—see following photos.
- The prosthetics are arranged on a letter sized sheet of paper, photographed and that image printed. This is a photograph of the second set of prosthetics sculpted on Mike’s face arranged on a random sheet of letter sized paper, printed out for use as visual for placing the tattoo on the actor’s face.
- The printed image of the forehead wrinkles and the prepared forehead prosthetic wrinkles side by side. Because it is life sized, I can use the printed image to help place the tattoo correctly during the application on the actor.
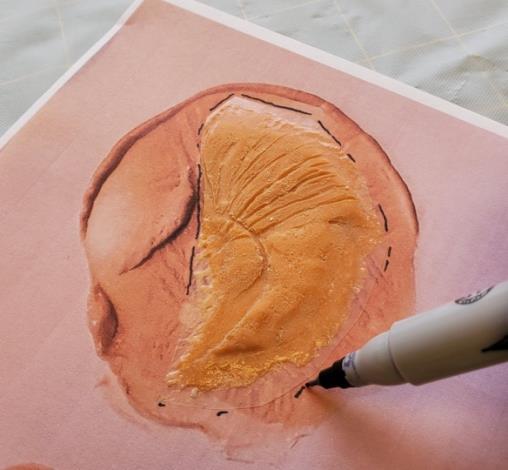
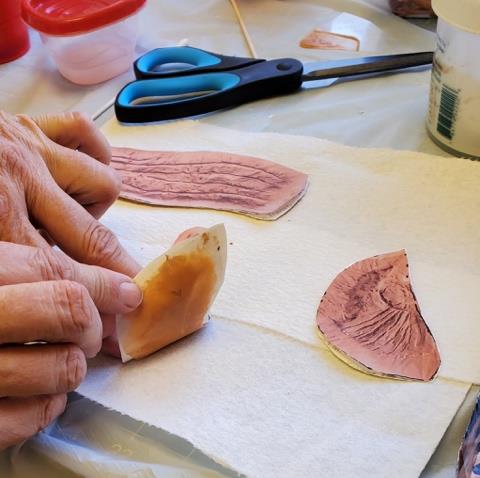
The prepared prosthetic is placed on top of the printed image so the shape of the piece can be traced onto the printed image. It is important to line up the image and the tattoo, matching the wrinkles on the prosthetic to the wrinkles on the print out. Trace the shape of the tattoo and the silicon treated acetate onto the printed photograph. Because I am a very cautious person and the prosthetic is VERY sticky, I traced the waterslide shape with a little bit of a buffer for handling the 3-D tattoo during application. If you decide to do the same, remember that you have that tiny buffer when you placing the tattoo. If you are careful, the image you have attached to the waterslide paper will accurately indicate the location of the Pros-Aide temporary tattoo underneath, making it easier to decide where to apply the tattoo. I have also included a photograph of preparation for the left eye laugh lines above right, so that you can see how I decided to prepare them for application. I cut the top, the eyebrow sag apart from the laugh lines. I will apply them separately. It is helpful to use a pair of non-stick scissors to cut the Pros-Aide prosthetics because they are very sticky.
- The forehead wrinkles and eleven prosthetics prepped along with the printed images which will be taped to the waterslide paper.

- Tracing and cutting the waterslide paper to match the copy of the prosthetics; the traced and cut printed photo is placed on top of the waterslide paper and traced, or taped (double sided tape works really well but use the smallest possible piece of tape!) to the waterslide paper and then cut in preparation for application.
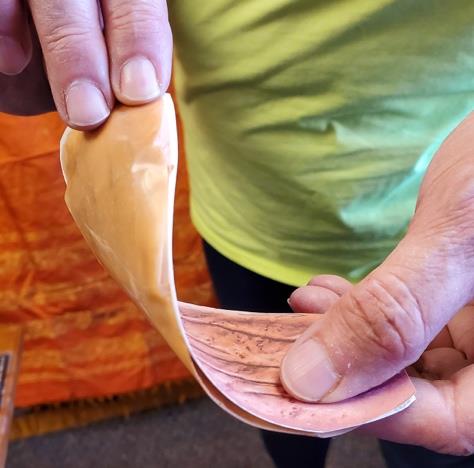
When you are ready to apply the prosthetics, you can press the waterslide paper onto the prosthetic. Be sure to apply the waterslide side of the paper to the prosthetic. Be careful to make sure the edges stick or you will lose your carefully prepared edges. If the waterslide paper doesn’t want to stick to the prosthetic, brush with a little Pros-Aide or 99% to make the piece sticky again.
The photographs above were taken of the temporary tattoos with the waterslide paper added. The waterslide paper has the printed full-size copy of the prosthetic taped to it so you can tell where the lines on the face will wind up. The first photo is folded so you can see top and bottom of the prepared prosthetic, the second photo is of a series of prosthetics ready for the face. Notice the scissors available for trimming if necessary. If you can invest in a pair of coated scissors, made especially for trimming adhesives, you will be glad you did. Coated scissors make the application process much easier
Gather a warm wet cloth or a spray bottle of water and an alcohol prep pad. Use the alcohol prep pad to wipe the area where you intend to apply the tattoo. Remove the silicon treated acetate backing on the 3D tattoo. Then, press the tattoo firmly in place. If you have attached the printed copy of the prosthetic to the waterslide paper, now is the time to remove it. (note: If you used double stick tape to attach the photocopy of the prosthetic for use in positioning, the place on the waterslide paper where the double stick tape was will not get saturated with water and will try to stick to the prosthetic. Use as tiny a piece of double-stick tape as possible, and have a Q tip soaked in 99% to help coax the small spot of waterslide to let go and this should not be a major problem.) Using the wet cloth or the spray bottle, gently wet the back of the waterslide paper until the paper releases the tattoo. See the following photograph.
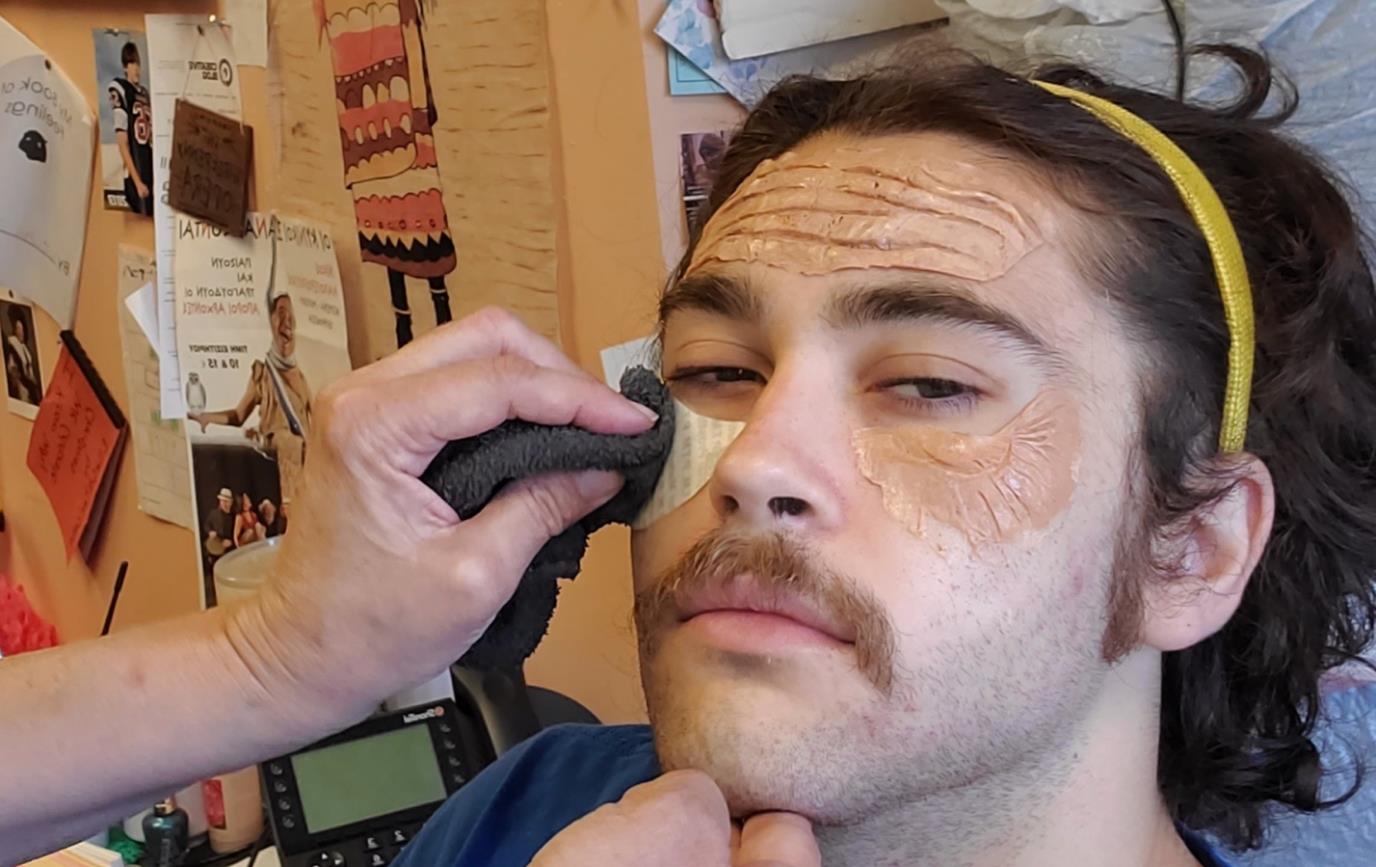
In this photograph you can really see the difference between the pre-painted prosthetic and the unpainted one. You can also see why you need to preserve the integrity of the prosthetic edge because the edge on the bottom of the forehead piece was stretched during the removal of the silicon treated acetate.
The photographs above are of the first attempt. This application took eleven minutes. The first photograph on the left is of the prosthetics freshly applied. In the second and third photographs, a layer of base make-up has been added. There is no further make-up application regarding character make-up or powder. After reaching this point, I decided to stop and make some adjustments. I was pleased with how quickly the application went. But, I noticed that, because I let the edges leach out to the hairline, the prosthetic didn’t stick to the skin well in certain places where hair got in the way. I learned that the forehead wrinkle edges absolutely have to end before the hairline begins, and that if there is heavy beard growth, the subject should shave the part of the face where the laugh-line edges will end. The forehead wrinkles and the forehead eleven should also be designed so that the edges avoid leaching over into the eyebrows. The eleven wound up being too big, because when I sculpted it, I did not consider the proportions of the space in the photograph to the rest of the face and that space in the photograph was far too wide to accommodate a prosthetic that was meant to stop exactly at the eyebrows. I was able to peel the offending part of the prosthetic away from the right eyebrow, but it was stuck firmly to the face on the left. Also, because I had never done this before with Pros-Aide, I was afraid to get the laugh-lines very close to the eye. I feared that the removal would be unbearable. It wasn’t. I used Telesis Make-Up Remover and it came off without causing Mike any discomfort at all. I am convinced that I would have been able to finish this make-up and make it work, even with its imperfections. But I decided to start over and redo the process in an attempt to fix the mistakes made.
What worked about the first application attempt
- The application was fast and painless, unlike working with latex or applying prosthetics in a more traditional manner, waiting for them to dry, and then applying the make-up needed to integrate the prosthetics to the face.
- Once the Pros-Aide prosthetics are on, they are going to stay on until they are removed.
- The Pros-Aide prosthetics move with the skin. The wrinkles on Mike’s forehead moved with his forehead and stayed in place when he raised and lowered his eyebrows.
- If something goes wrong, it can be easily fixed, it just adds to the time spent doing the make-up. Alcohol on an applicator dissolves the Pros-Aide and allows you to change the prosthetic. But that does take time and becomes tedious.
- Although it takes a little longer to remove the make-up, it doesn’t take very long at all. And with the right make-up remover, it comes out of hair fairly easily, unlike latex
What did not work during the first application
- The design was faulty. The smaller the prosthetic the better, and hairlines must be avoided. If you look at the photographs of Mike above, you will notice that where the prosthetic can interact with just his skin, it works. Where it meets a hairline, the edges want to peel away. The little hairs on his cheek above the fullness of his beard prevent the laugh-lines from working; but the edge of the same prosthetic close to his nose and up around the eye works well. Similarly, the bottom of the forehead edge works well, the top is too high and runs into random hairs that prevent it from staying close to the face. The eleven is too big, and has to be designed in a manner that moves the edges away from the eyebrows.
- Any painting of the prosthetic using the alcohol-based makeup should be done prior to the application. For some actors, the smell of the 99% alcohol is very unpleasant and causes ventilatory stress. After the application of the prosthetic, if it is necessary to add base or highlight and shadow, it is best to use crème makeup. Alcohol based makeup should be used sparingly, away from the eyes and nose once the prosthetic has been applied to the face.
- Even though one of my goals was speed, I should not have rushed the process. Take the time to measure the prosthetic against the forehead and trim it down if you feel it is necessary prior to removing the acetate exposing the sticky side of the tattoo. Once the acetate has been removed, it is very difficult to trim the prosthetic. The forehead would have worked much better if I had taken the time to double check the edges against the hairline before I removed the acetate.
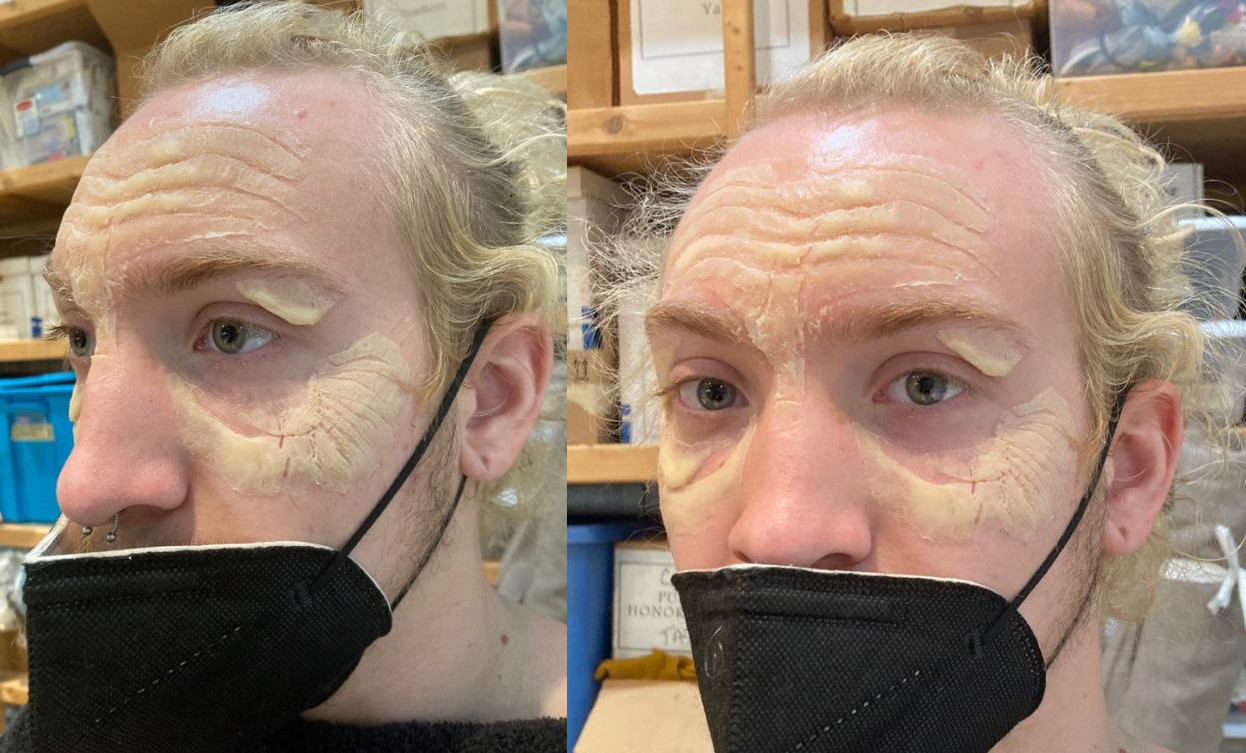
The following photograph is of the second application using smaller prosthetics and took 25 minutes to apply. This photograph shows the left side of the face with the pre-painted prosthetics applied to a bare face with an application of base and a little stipple added.
This application is better but still not perfect.
What I learned from this application
The edges of the prosthetic have to be good and stuck to the waterslide paper or you run the risk of ruining your carefully prepared edge. You can see what happened to the edges of the forehead wrinkles and the eleven because I added the waterslide paper at the last minute. Try to give the waterslide paper enough time to get stuck to the prosthetic. Then you won’t stretch out the edges of the prosthetic when you remove the silicon treated acetate. The other unfortunate problem created by the fact that the waterslide paper did not want to stick to the tattoo was that I had to really work to get the silicon treated acetate backing off the actual tattoo and that added unwanted time to the application process. It took twice as long to apply the prosthetics because I wound up spending more time removing the acetate backing than any other aspect of the application.
You will do yourself a huge favor if you have a razor handy to get rid of unwanted hair. Mike said he shaved, but he is so hairy that we still ran into problems with stubble on his cheeks, AND the hair under his eyebrows caused problems during the application of under eyebrow sags. I couldn’t get the jowls to stick because of the stubble on his jaw.
The third application is a charm
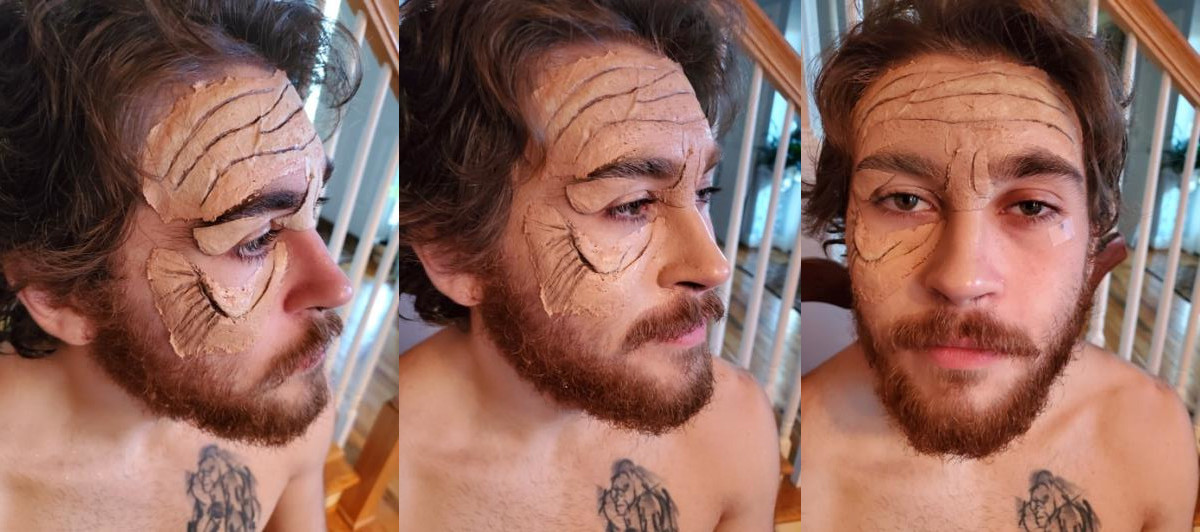
The photographs below are from the third application I did using the second set of prosthetics. This application was very successful, although I only did the top half of Mike’s face.
This application is by far the most successful. The prosthetic edges all stuck to the waterslide paper and removing the acetate was fairly easy. For this application, I left the under-eyebrow sag connected to the under-eye pouch and laugh lines. Mike’s suggestion was that they be applied separately, because he found that application a bit uncomfortable. I did place the under eye pouch a little low because he kept flinching. The eyebrow eleven lines needed some shadow because they were too shallow, so I extended the shadow into the corner of the eye. Finally, if you are still having a hard time with edges that flip up, brush the edges with a little Pros-Aide cream.
Tips for application: have a razor handy! I shaved the hair above, beside and between Mike’s eyebrows so the prosthetics would stick to the skin. And have some 99 percent alcohol and applicators close by in case your acetate wants to stick to the prosthetic; you can coax it off with a Q-tip and alcohol. Have a brush and Pros-Aide cream ready to smooth out edges if necessary.
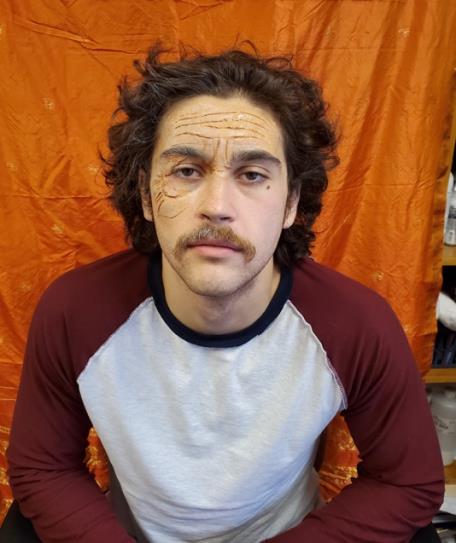
Because Mike had been so generous with his time already, for this application I told him we would just do one side of his face as quickly as possible. But I didn’t rush. I held the prosthetics up to his face to see if they fit into the allotted spot, made sure the spot was hairless, trimmed up the under-eye sag to fit under the eyebrow and wiped the skin with a prep pad. After the prosthetics had been applied to his face, I added a base, a little highlight and shadow, some color and stipple, and I couldn’t resist adding the subtle gray streaks to hair and beard. I didn’t do much, because I had promised him that it wouldn’t take very long. We spent about 25 minutes on his face total, including the make-up added after the prosthetics were added to his face. I did not apply the laugh lines and under-eyebrow sag to the left side of his face. It took about 2 minutes to take it all off. The following photographs were taken at the end of the session using my cell phone.
The above photo is at about 8 inches away.
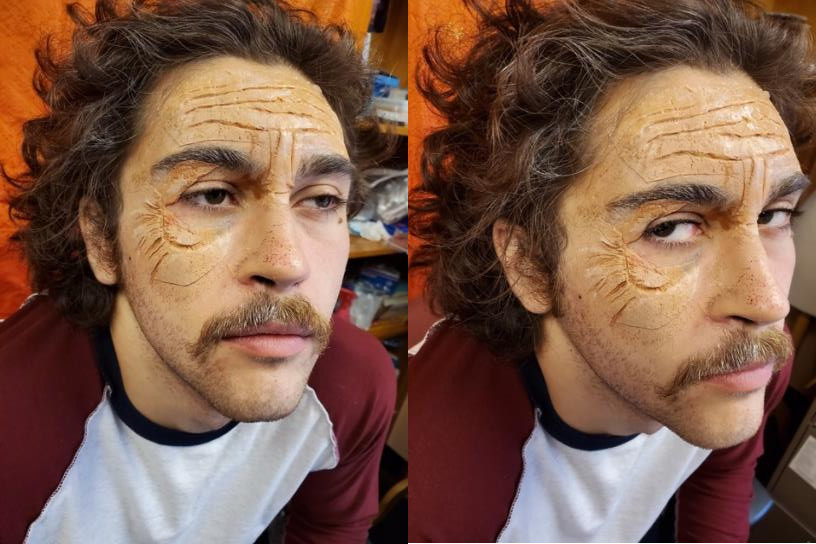
The above two photos are taken about 8 inches away.
The above photo was taken at approximately 2 feet.
Remove the Pros-Aide prosthetic with Telesis water-proof make-up remover, DC 244 or 245, or with isopropyl myristate. (I used Telesis to remove this piece.)
Production application from February 2022
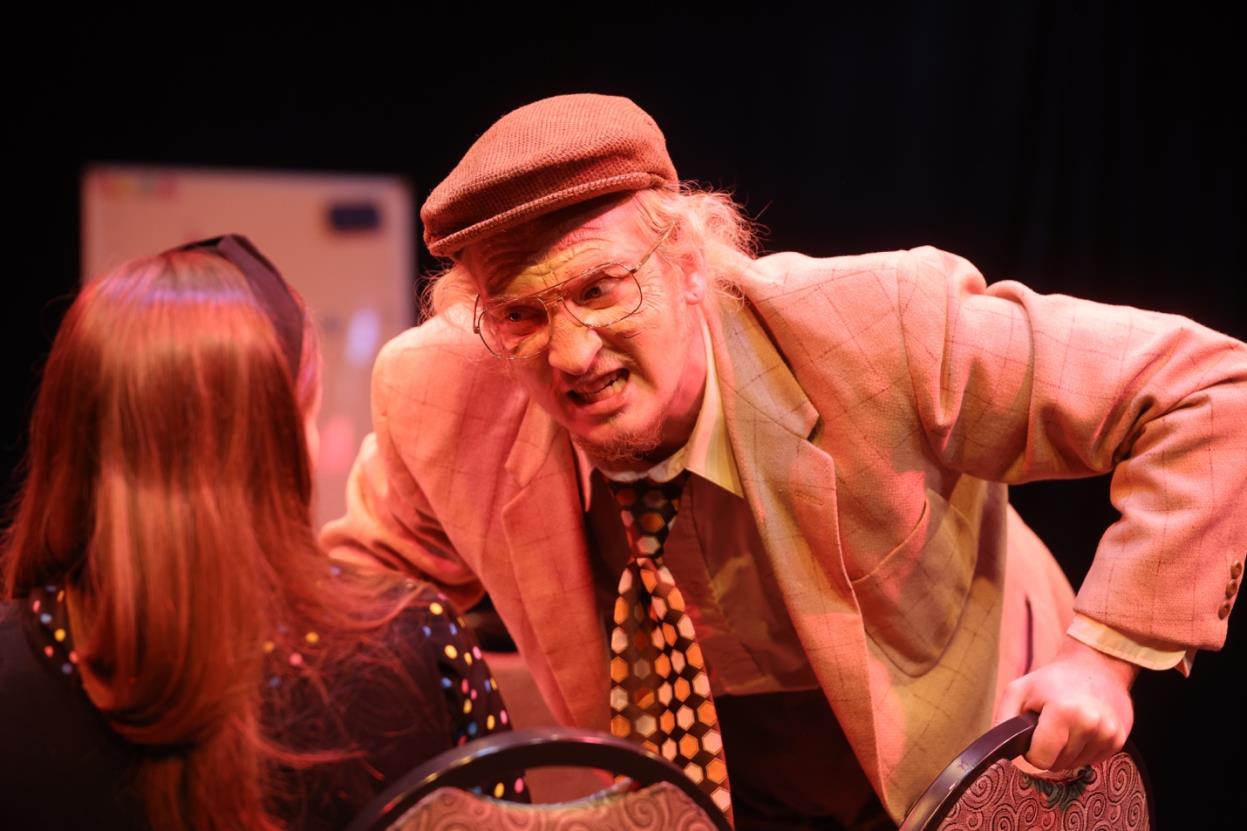
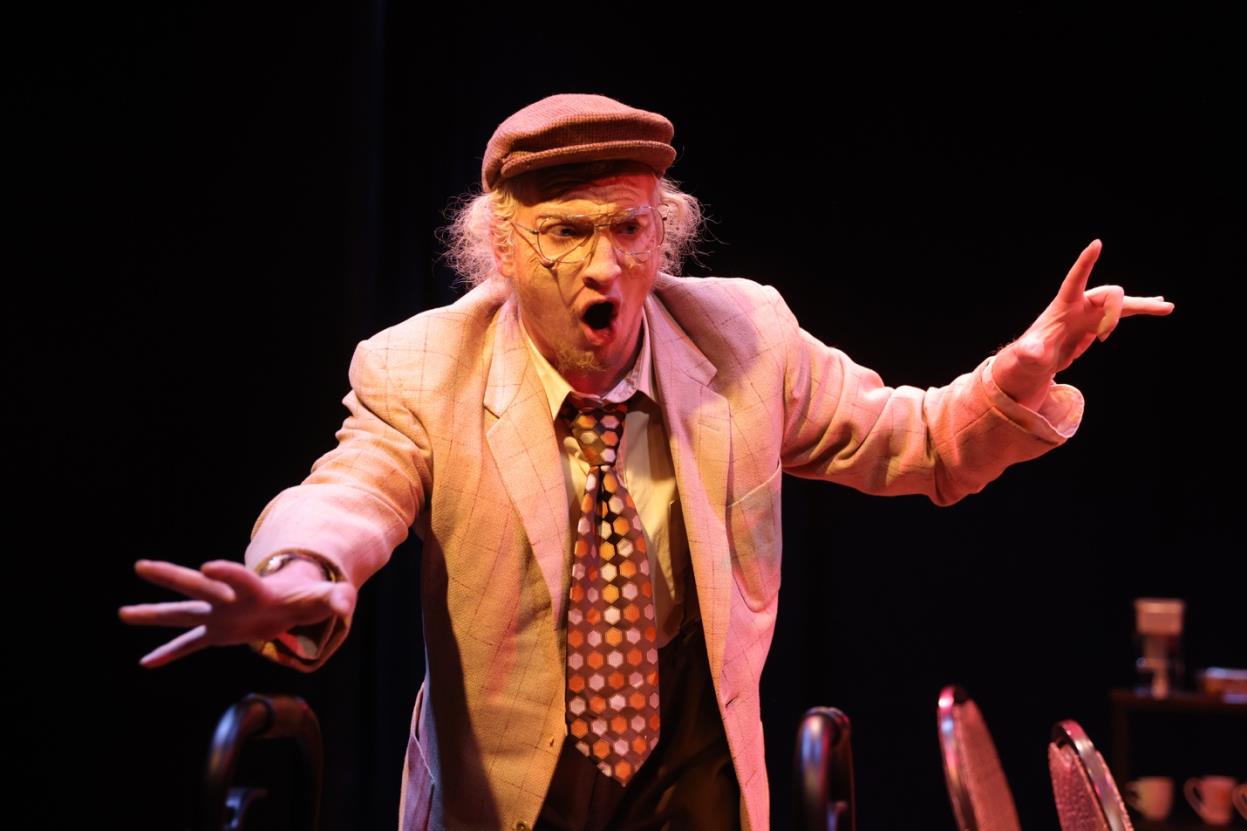
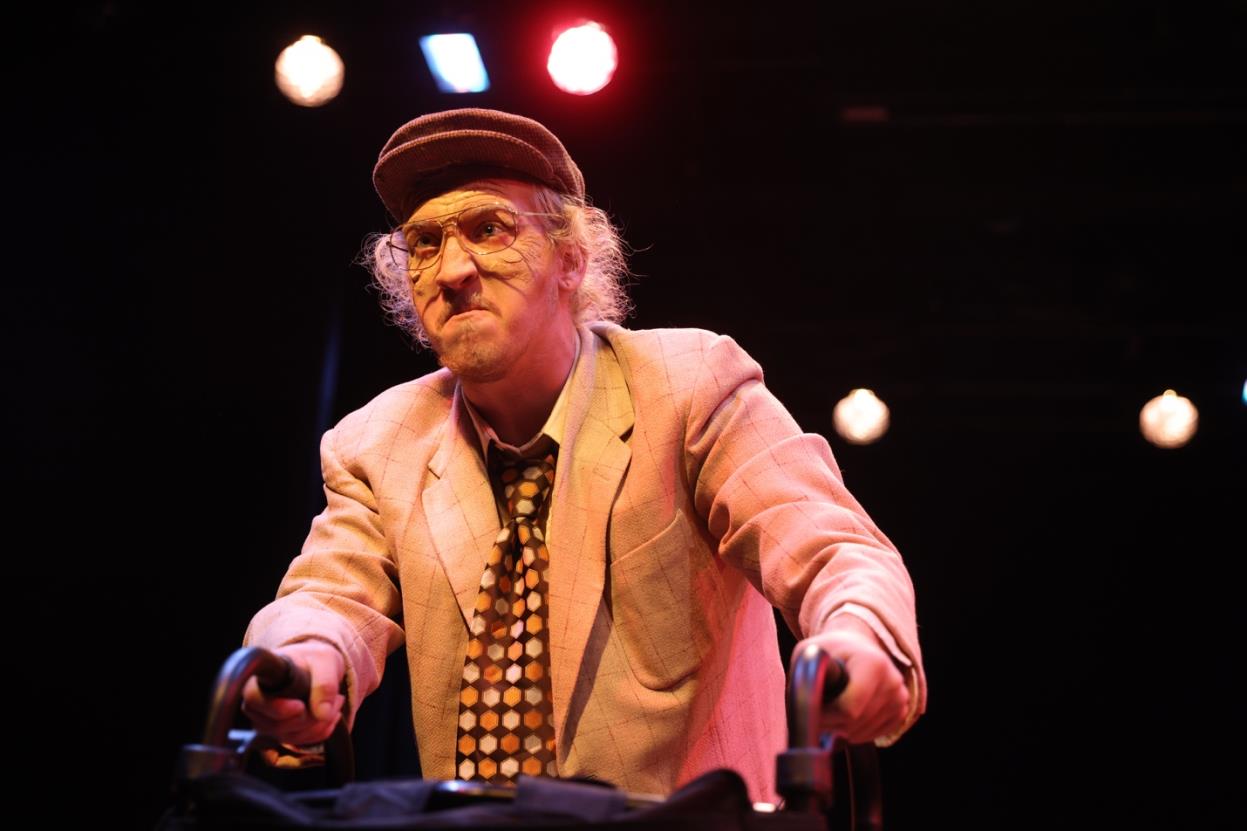
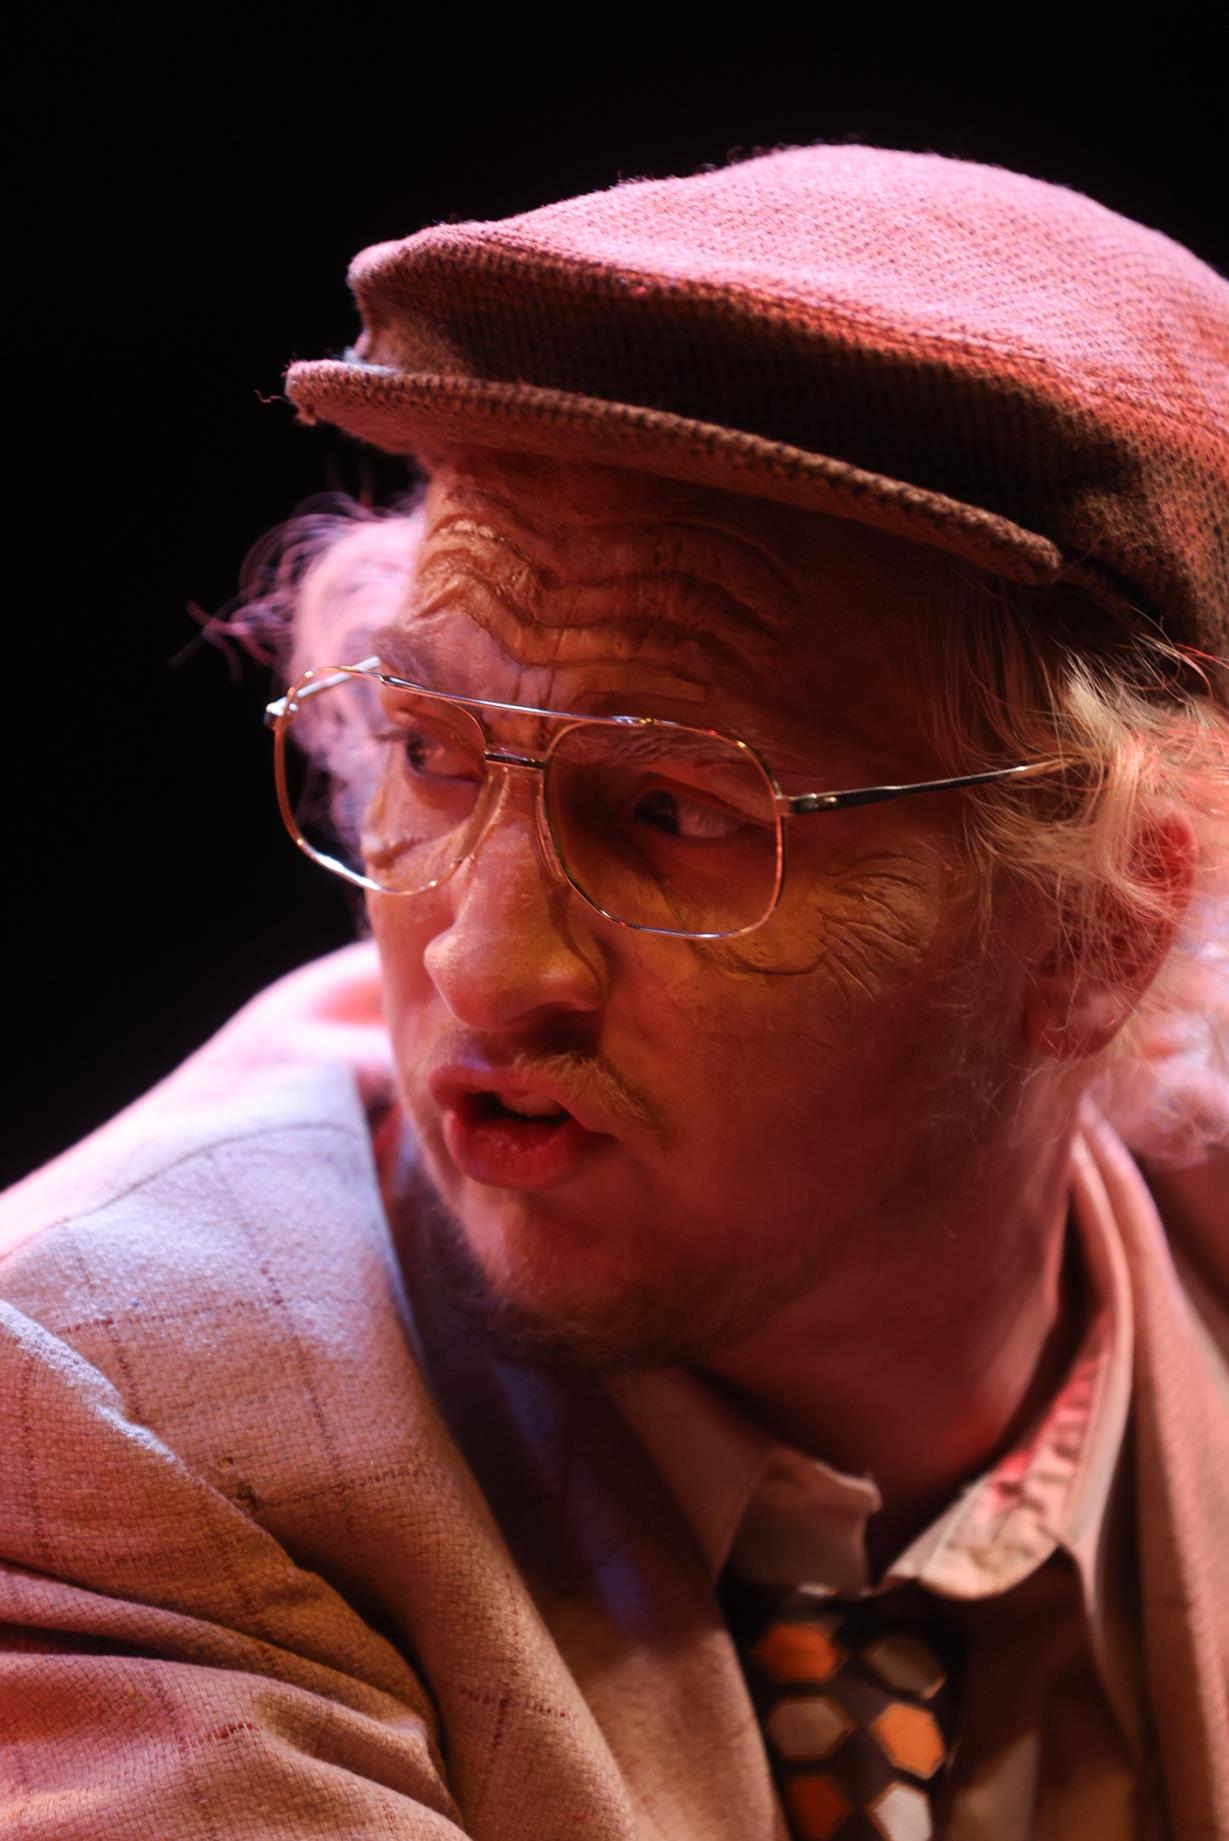
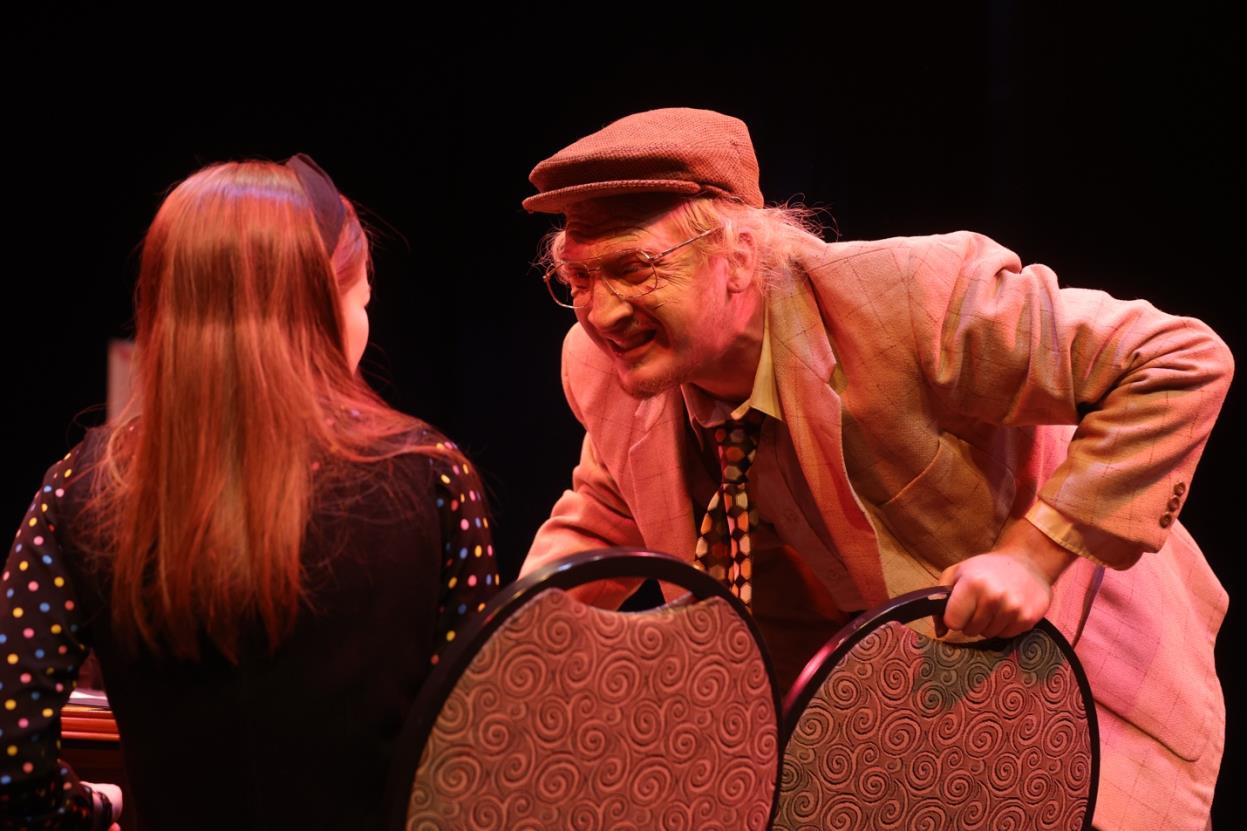
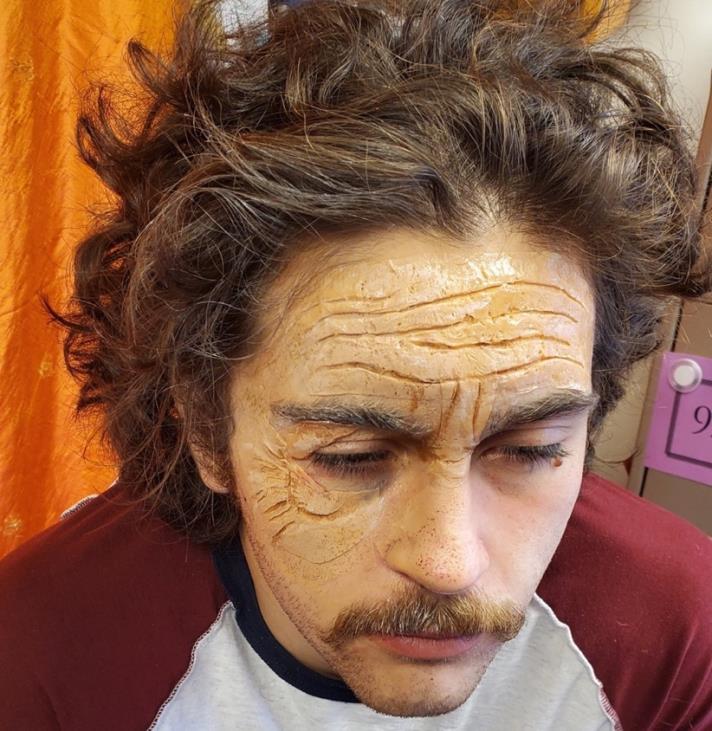
The Pros-Aide tattoos were built for Furman University’s Production of Do You Feel Anger by Mara Nelson-Greenberg, directed by Margaret Rose Caterisano. The photographs are of William Bickerstaff, who plays Rafalgore.
The photographs above are from the first technical rehearsal. The prosthetics went on as planned. This process took under 15 minutes. William then just powdered and applied his base. The prosthetics looked great in the costume shop, but the colors of the lights were so saturated that we felt that shadow needed to be applied to the prosthetics prior to application for the rest of the rehearsals and for the performances.
The following photographs are of the application of a pre-painted temporary tattoo. Andra Enache, the wardrobe crew head for the production, applied the pre-painted prosthetics. Ori McMullen, a wardrobe crew member who was in charge of greying hair in the production, would paint William’s hair. Because there was uncertainty over whether or not the cast would be permitted to perform without masks, and because masks were still mandatory backstage, no prosthetics were built for the lower portion of William’s face. A little Pros-Aide was stippled onto his nose for added texture there and Ori added hair white to his beard.
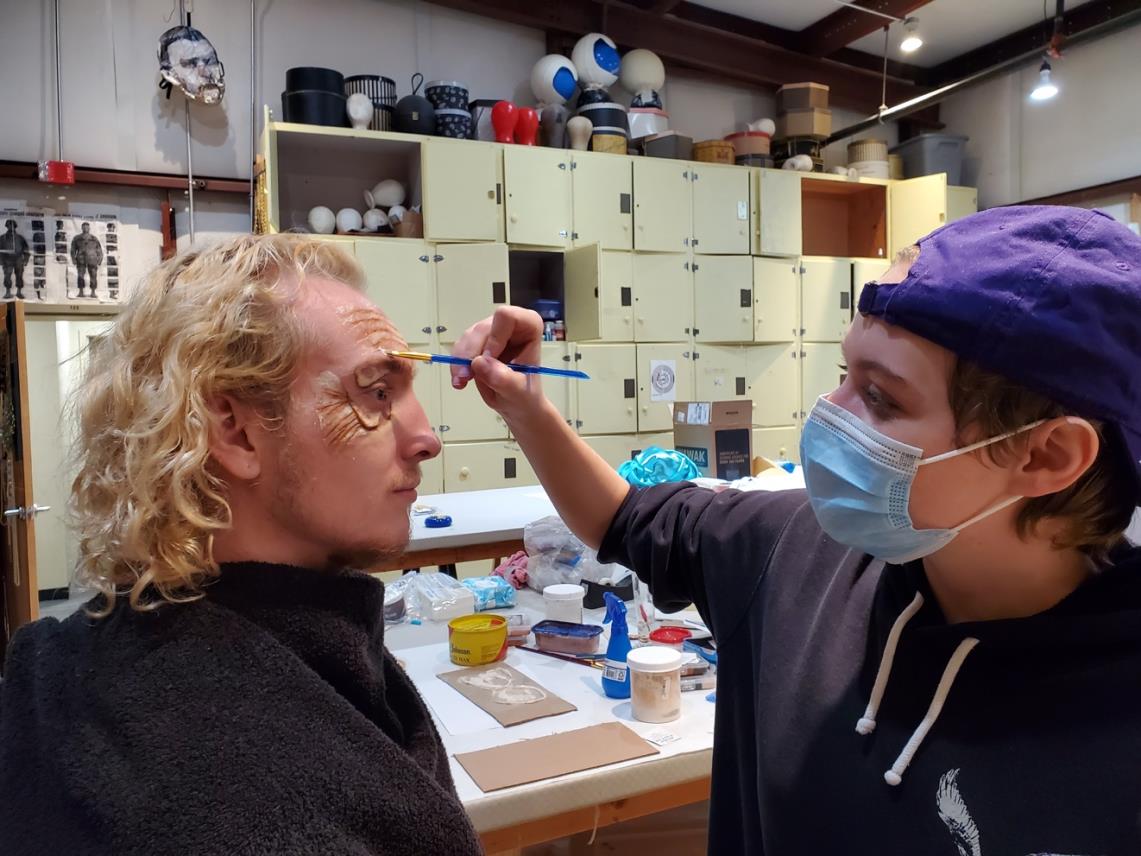
Andra applys the tattoos and a line of Pros-Aide cream to an unsightly edge.
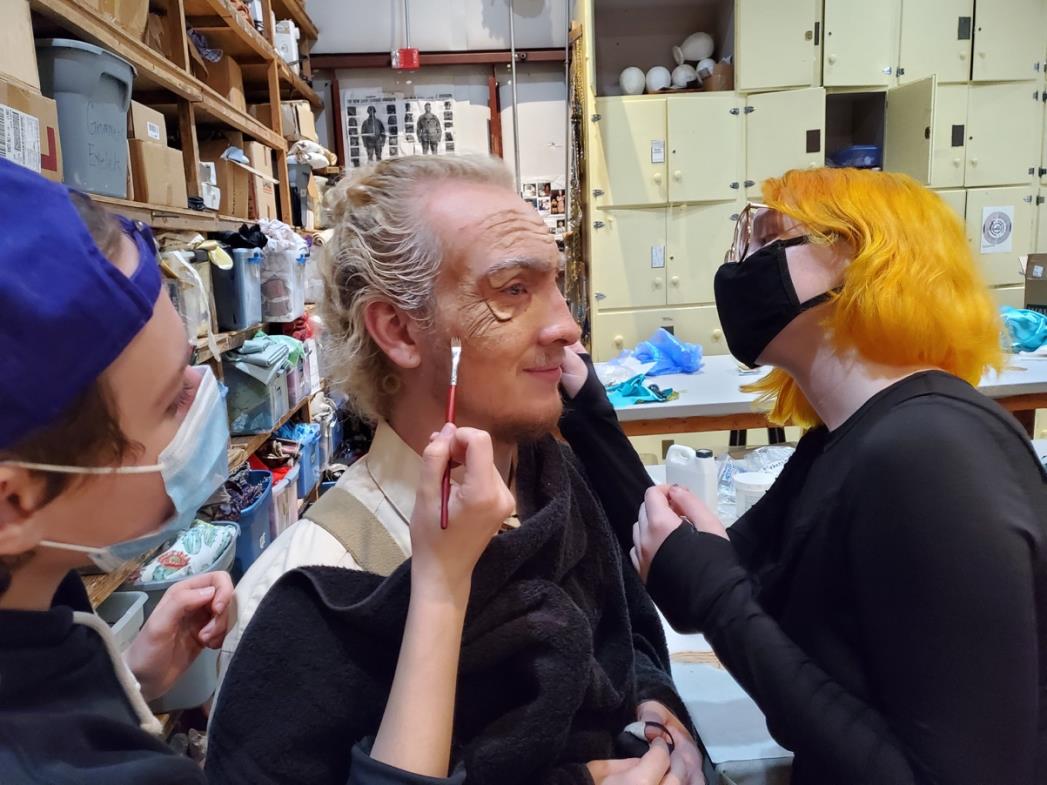
While Ori works on William’s hair, Andra adds shadow to the hollows at his temples and cheeks.
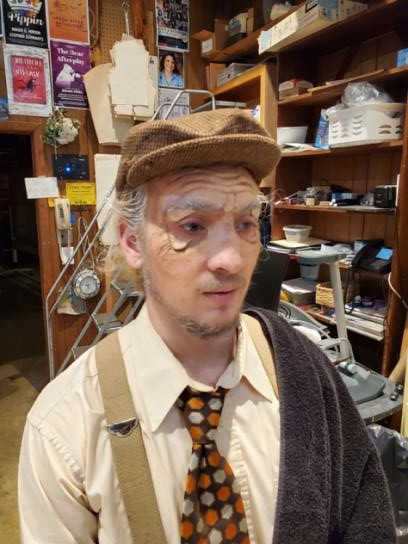
William in the shop before the show

William onstage during the show.